
Getting Started
This guide walks you through connecting an AI client to a Shopware shop using the built-in MCP server.
Prerequisites
- Shopware 6.7 or later
symfony/mcp-bundleinstalled — verify withcomposer show symfony/mcp-bundle. If it is missing, ensure it is listed as a dependency incomposer.jsonand runcomposer install.- The
MCP_SERVERfeature flag enabled (see Configuration)
Step 1: Enable the feature flag
Add the following to your .env file:
MCP_SERVER=1This activates the MCP endpoint at /api/_mcp and registers all tools, resources, and prompts.
Step 2: Create an integration
Create a Shopware integration for the MCP client. The integration provides the credentials the client will use to authenticate.
bin/console integration:create "My MCP Client" --adminThis outputs an access key and secret:
SHOPWARE_ACCESS_KEY_ID=SWIA...
SHOPWARE_SECRET_ACCESS_KEY=...
Restrict access
The --admin flag grants full Admin API access. For production use, omit --admin, create a dedicated ACL role with only the required permissions, and assign it to the integration. See Configuration for details.
Step 3: Configure your AI client
Claude Desktop and Cursor
Both clients use "type": "streamable-http". Add the following config to the appropriate file:
| Client | Config file |
|---|---|
| Claude Desktop (macOS) | ~/Library/Application Support/Claude/claude_desktop_config.json |
| Claude Desktop (Windows) | %APPDATA%\Claude\claude_desktop_config.json |
| Cursor (project) | .cursor/mcp.json in your project root |
| Cursor (user) | ~/.cursor/mcp.json |
{
    "mcpServers": {
        "shopware": {
            "type": "streamable-http",
            "url": "https://your-shop.example.com/api/_mcp",
            "headers": {
                "sw-access-key": "SWIA...",
                "sw-secret-access-key": "..."
 }
 }
 }
}
Claude Code
Claude Code uses "type": "http" — the MCP spec calls the transport "streamable-http", but Claude Code only accepts the shorter form. Create .mcp.json in your project root:
{
    "mcpServers": {
        "shopware": {
            "type": "http",
            "url": "http://localhost:8000/api/_mcp",
            "headers": {
                "sw-access-key": "SWIA...",
                "sw-secret-access-key": "..."
 }
 }
 }
}
Or register via CLI:
claude mcp add --transport http shopware http://localhost:8000/api/_mcp \
 --header "sw-access-key: SWIA..." \
  --header "sw-secret-access-key: ..."
Keep credentials out of version control
Never commit .mcp.json, .cursor/mcp.json, or other files containing integration credentials. These files are already listed in the Shopware project template's .gitignore.
Codex
Codex stores MCP servers in config.toml, not in a JSON file. Add the server to ~/.codex/config.toml (global) or .codex/config.toml in a trusted project:
[mcp_servers.shopware]
url = "https://your-shop.example.com/api/_mcp"
env_http_headers = { "sw-access-key" = "SHOPWARE_MCP_ACCESS_KEY", "sw-secret-access-key" = "SHOPWARE_MCP_SECRET_KEY" }
enabled = true
The url field tells Codex this is an HTTP MCP server. No type field is needed. The env_http_headers values are environment variable names, not the credentials themselves. Export the actual values in your shell:
export SHOPWARE_MCP_ACCESS_KEY='SWIA...'
export SHOPWARE_MCP_SECRET_KEY='...'
Why not codex mcp add --url?
The CLI shortcut supports bearer-token auth but not custom HTTP headers. For Shopware's sw-access-key / sw-secret-access-key auth, editing config.toml directly is required.
Step 4: First connection
After adding the configuration, open or restart your AI client and look for the Shopware MCP server in the tools panel. The first connection may take a few seconds while Shopware boots its kernel and warms up caches. If the client shows "No tools" briefly, wait a moment and refresh.
Verify the server is working with the CLI:
bin/console debug:mcpThis lists all registered tools, prompts, and resources, the same view that the AI client sees.
Authentication methods
Integration credentials (recommended)
Pass sw-access-key and sw-secret-access-key as HTTP headers. Credentials are valid as long as the integration exists, with no token expiration or manual refresh required.
Bearer token
Standard Admin API OAuth bearer tokens also work. Obtain one via the /api/oauth/token endpoint. Tokens expire (default: 10 minutes), so integration credentials are preferred for persistent MCP clients. When authenticated via bearer token, the user's per-user allowlist applies (configured under Settings → Users & Permissions → [user] → MCP Tool Allowlist).
Controlling which capabilities are available
By default, an admin integration can call all registered tools, resources, and prompts. To restrict access:
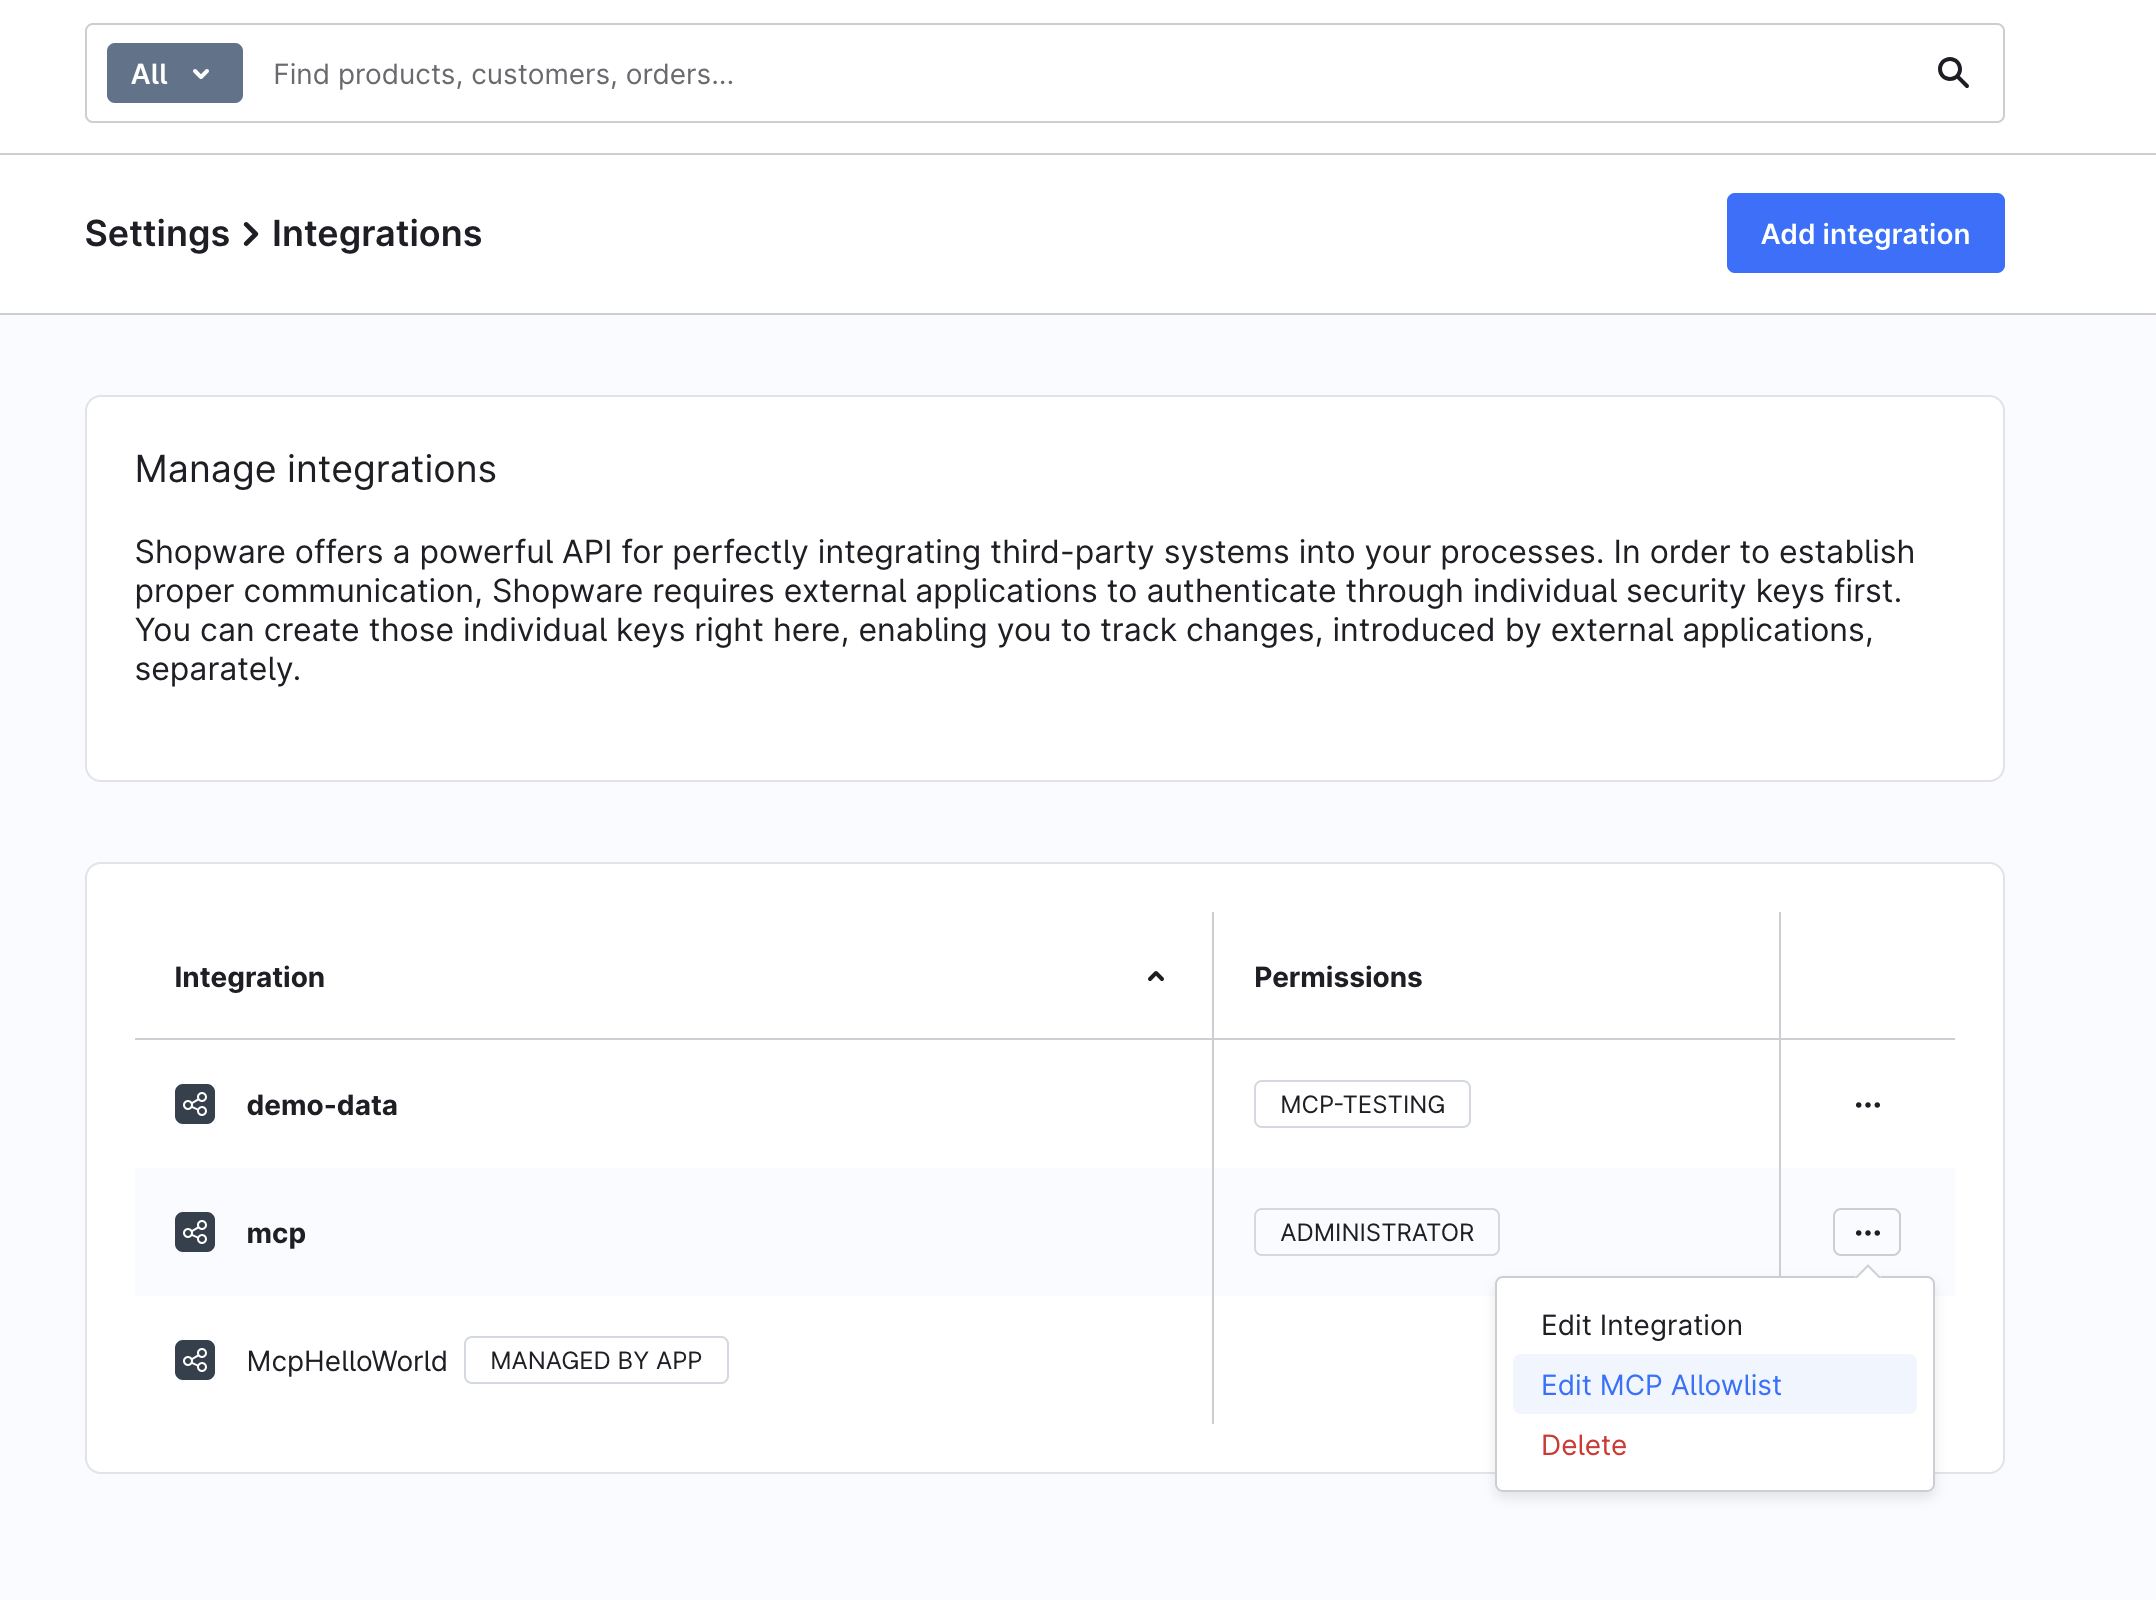
Per integration — Go to Settings → Integrations, open the context menu for your integration, and select Edit MCP Allowlist:
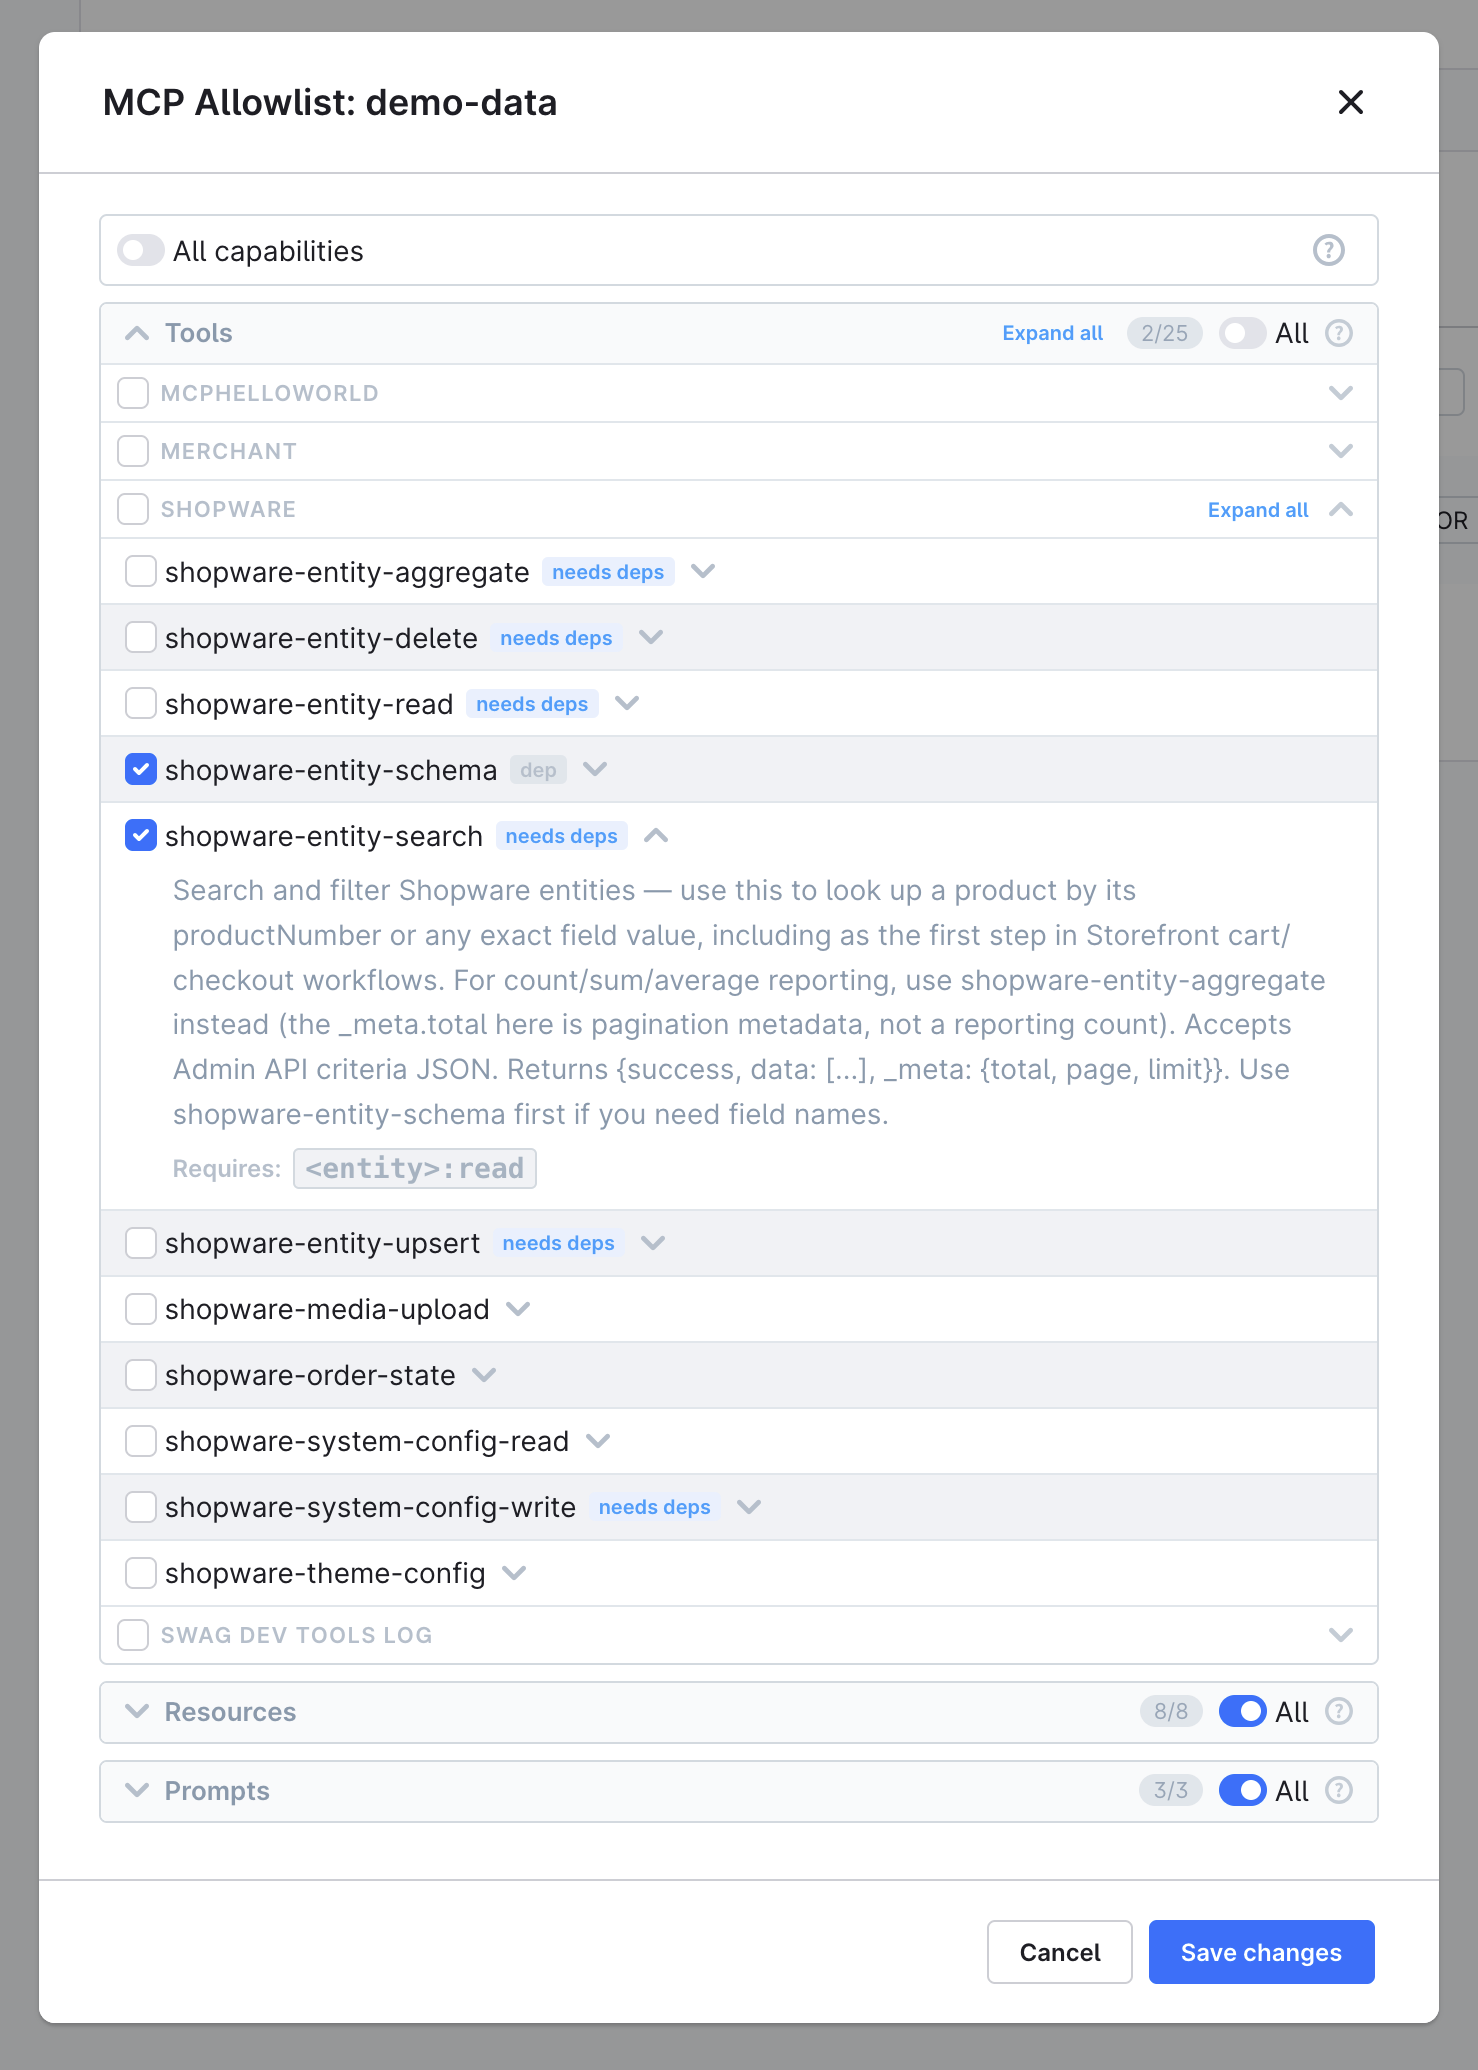
Disable the toggle for each capability type and select only the tools, resources, and prompts this integration should use:
Per user — Go to Settings → Users & Permissions, open the user detail page, and manage the MCP Tool Allowlist card at the bottom of the page. This allowlist applies when the user authenticates via a user access key or bearer token. Admin users bypass the allowlist entirely.
When a tool is enabled, its declared dependencies are automatically included. For example, enabling shopware-entity-delete also enables shopware-entity-search and shopware-entity-schema because they are required for it to work.
See Configuration for the global allowed_tools safety switch, the full per-principal allowlist reference, and session store options.
Next steps
- Tools Reference: explore all built-in tools and resources
- Examples: try common workflows end-to-end
- Troubleshooting: fix connection and permission issues
